|
BULB LOG 04 - 25th January 2006
On Saturday we had the SRGC Digital Day of workshops looking at everything from taking the picture to the finished PowerPoint slide show. Of course it was too much for people to take in, it takes years to learn all that, but it was intended as an introduction, the "index" and now we will have to follow it up by going through the chapters one by one. So, why am I telling you all this in the bulb log? Well I was amazed at how interested people were by the very basics of photography so I thought that I would drop bits of it into the log from time to time - I know many of you are expert photographers, I see that every day on the Forum.
All the digital cameras have automatic exposure systems and to get the best from your camera you should have some understanding how they work and know the
limitations.

Black Grey and White
When your camera sets the exposure it tries to turn all tones into 18 percent grey. In each of the three pictures above I have three sheets of card, one black (top), one 18percent grey (middle) and one white (bottom). This is exactly how the three pictures came out of the camera; I have not adjusted the exposure or colour in any way, I just resized them and put them into a montage. In the centre picture I set the exposure by pointing the camera at the grey card; notice how the black and white cards have turned out fairly true to the actual shades. On the left I set the exposure from the black card - this has caused the black card to go grey and it is very difficult to tell the grey from the white. The exposure of the right hand image was set from the white card and the camera has tried to turn the white card grey. Because the exposure system tries to turn both black and white to grey if you are photographing a black or a white subject you need to compensate for the camera by shortening the exposure for black
subjects ( - one or two stops) and lengthening it for white subjects (+one or two stops). In general shots the system works perfectly well but in extremes of black and white you need to compensate.
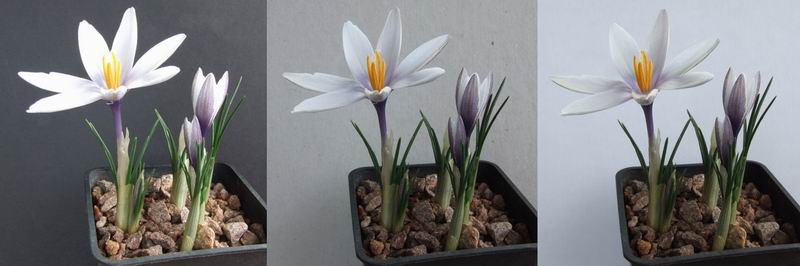
Crocus with Black Grey and White
Here I have photographed Crocus michelsonii against the black (left), grey (middle) and white (right) cards - notice how the tone of the background card has affected the exposure of the crocus. In the left hand one, against the black card, the crocus has been over exposed while the right hand one is underexposed and the middle one, against the grey card, is spot on. This is one of the main reasons that I use a grey card background for so many of my photographs because it is seen as neutral by the camera's built-in exposure system.

Crocus michelsonii x2
Two other reasons I use the grey card are, one, it generally makes the subject stand out clearly without causing any colour cast that you may get if using a coloured background. The second is that with digital images saved as JPEGs, the files are significantly smaller with a grey background than the same image would be with a background full of detail. Now for the plant, this is the fabulous Crocus michelsonii, notice the flower to the left of the group is a bit different. Most of these are clones but the enlarged one is the first flowering of a seedling and its inner three segments
are creamy in colour - there are a few more seedlings in this pot that I hope will flower next year.

Crocus michelsonii
This is looking into the centre of the cloned one, notice that it has extra petals; it has a tendency to have more than the normal 6.

Crocus imperati
While Crocus michelsonii is stunning and very rare, how dramatic is the more common Crocus imperati when it opens? When it is open and viewed from above all six petals look similar in colour.
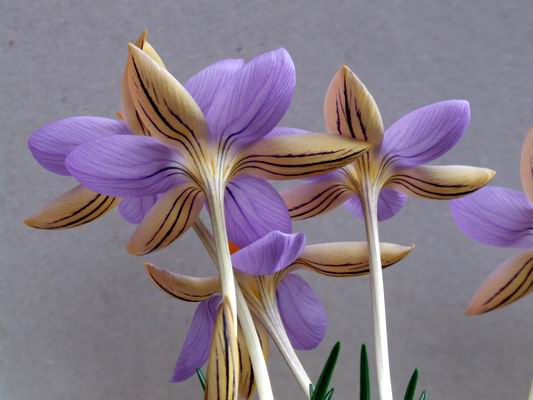
Crocus imperati reverse
But what a stunning contrast there is when it is viewed from the reverse. This form has strongly marked feather markings on the reverse of the outer three petals.
Narcissus romieuxii 'Hat'
This is another selection from Narcissus romieuxii that has been given the name 'Hat'. I do not think it is a registered name but one of those pet names that growers give a plant that is a bit different. I received it a number of years ago and it increases and flowers well.
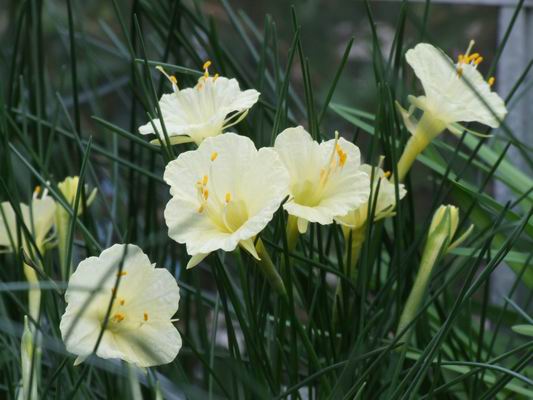
Narcissus eualbidus
One of my absolute favourites is Narcissus eualbidus. I know this is not a valid name but that is the name I received it as and nobody knows for sure what else to call it. It is a wee stunner with upward looking flowers and the style and stamens protruding well beyond the corona.

Taking the picture
Removing a pane of glass is just one of the extremes I have to go to get the picture I want without moving the pots. Why not just move the pot? Well the roots will be down into the sand plunge and I do not like to disturb them unless I have no other choice.

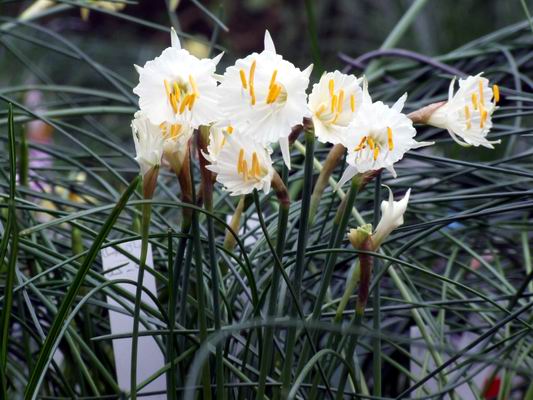
Narcissus romieuxii rifanus mixed
Last week I showed Narcissus romieuxii rifanus which I did not believe was correctly named - now the pot is in full flower I have my answer. Some years ago I was given a packet of tiny bulbils which I have grown on to flowering size and as this picture of the pot full shows there is mixture of pale Narcissus romieuxii rifanus mixed through with the more yellow romieuxii that I showed last week.

Colchicum luteum x kesselringii
Appearing at almost exactly the same time as last year is my own hybrid between Colchicum luteum x kesselringii. Even though it has flowered for the last few years I do not think the bulbs have reached their maximum size yet I hope that when they do they will start to increase a bit better so I can get it spread it around.
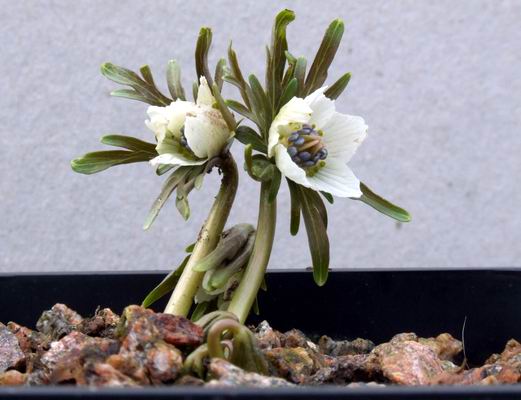
Eranthis pinnatifida
The first couple of stems on our Eranthis pinnatifida have also just sprung upwards and the flowers are just unfurling - again, to the week, at the same time as last year.
^ back to the top ^
|
