|
BULB LOG 30 27th July 2005
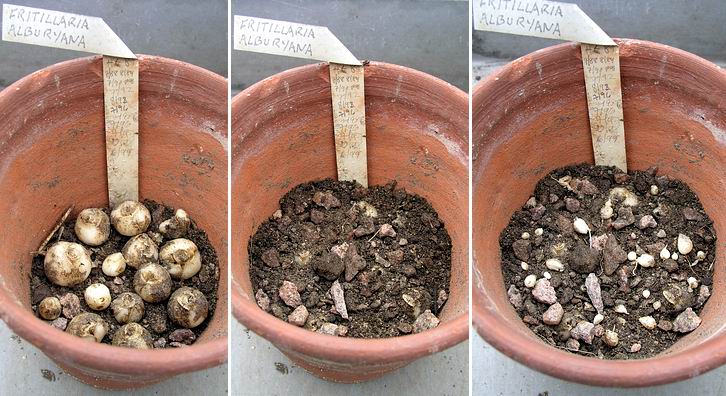
Repotting Frit. Alburyana
I am still using clay pots for many of the mature fritillaria bulbs in the frit house, this year,to give me more time to asses how those that I have transferred into plastic pots perform. The sequence above shows a nice potful of Fritillaria alburyana being repotted with the largest bulbs being placed about 1/3 from the bottom; they are then just covered over with compost before I place the smaller bulbs and 1st year seedlings at about the half way point.
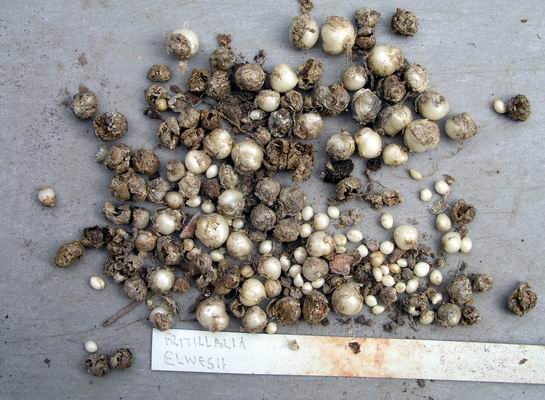
Frit. elwesii rice
I want to return to what I was saying last week and look at some of the problems that I find when I am repotting the bulbs and especially the frits which seem much less forgiving of poor conditions than most of the other bulbs we grow. This is a pot full of Frit elwesii rice of various ages from rice grain to pea sized. Notice how some of them are perfectly healthy, while others have died, leaving only the dried out remains - a ghost. What is it that went on in this pot, over the last twelve months, that caused about half to die out while others were fine? Interestingly the pot of mature Frit elwesii bulbs has done exactly the same; half died and half are fine. It would seem to me, from the evidence above, that the bulbs that died never got growing at all last autumn for some reason. I sometimes wonder if this damage may be a result of repotting so early into a compost that, while not wet, is slightly moist, could cause some rot through the summer - that is why my ideal would be to repot all the bulbs the day
before I give them the September storm. However if it were the case that it was a summer wet rot, I would not have found these dried up remains! It could also be that as the bulbs were seed raised originally and then increased by the rice grains that this species freely produces, I have different clones, some of which are more tolerant of our conditions and climate.

Fritillaria rice in bag
While I was repotting I placed some rice grains and small bulbs into a plastic bag for an hour or so, it was a cloudy cool day but still a condensation formed inside the bag, showing how quickly these bulbils can loose moisture when out of the ground. If you have to store rice it is best to keep it in plastic bags in a fridge at a steady temperature of 2 C to 4 C. I know from experience that you can do terrible things to rice grains (like leaving them in a paper bag in the glasshouse all summer) and they will still grow but if you want the best from your bulbs: look after them. I can also tell you that if you leave rice grains in a plastic bag in the fridge for a whole year, without being planted at all, they will slowly wither away and be replaced by a new, but smaller, rice grain which grows on if planted. I do not recommend this treatment but it does show that these plants are determined to grow and have evolved a remarkable survival mechanism to cope with many extremes.
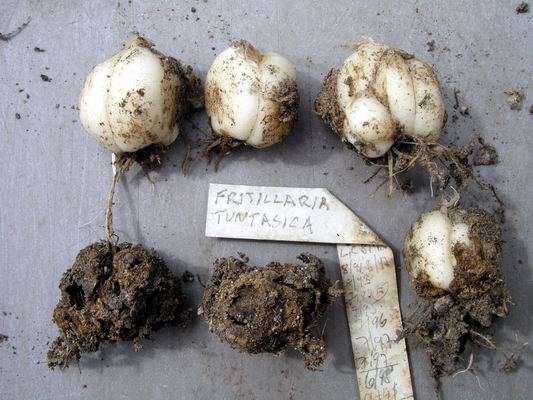
Fritillaria tuntasia bulbs
Here you can see a similar scenario: this time with mature bulbs of Fritillaria tuntasia, where four out of the six grew well and two are now ghosts. Again I am sure that these bulbs died before they ever started into growth last autumn. As I have not changed anything that I do in the way of watering etc. I can only presume that the death of these bulbs is due to the climate at a particular time and probably early in their growth cycle.

Unhealthy frit bulbs
The 'ghost' bulb on the left is nothing but the dried out remains of what was a perfectly healthy bulb this time last year but look carefully and at 3 o'clock and 5 o'clock you will see a tiny rice grain has formed so not all is lost. The bulb on the right has grown to an extent but the old scales are still quite thick when they should have shrunk away to almost a skin-like remnant: this bulb has been in what I call 'survival mode'. For some reason the root growth was either very poor or non existent so the old bulb has passed its food store onto a new bulb without ever putting up any leaves or stem.

Fritillaria bulbs
These three bulbs, all grown in the same pot, have all faired differently. The one on the left is healthy, the centre one has grown but the old bulb has not withered away fully so it has had a check, and the one on the right is now a ghost. The conditions in a small pot cannot differ so much from bulb to bulb so I think that this is good evidence to show that bulb clones adapt differently to climate and condition changes so that no matter what happens some are likely to survive. The moral of this is to raise your plants from seed, so you are growing a range of clones and not a mono culture of a single clone. (or it could be to get your conditions right!)

Fritillaria bulbs rot at base
Another symptom: this time where the new season's bulb has grown but it has rotten areas. This rot is mostly found around the base where the remains of the old roots and stem pass through the scales of the bulb - the bulbs above display rot in varying degrees; worst on the left and absent on the right. This type of rot is caused by the compost being too wet and cold in the spring after they have flowered - exactly the weather conditions we suffered this year.

Rotten frit bulbs
Here is an extreme case where you can see these bulbs have suffered both of the previous conditions: on the left spring wet rot and ghosts on the right. I would have lost this species altogether if I had not collected the few seeds it produced last year and sowed them into the pot when I repotted them last July - you can see five healthy seedlings at the bottom of the picture. I will also cut all the rot off the remains of these damaged bulbs then chop up the clean parts of the scales: place these in sand in plastic bags and keep in the fridge for a year in the hope that I will get some small buds forming, as I discussed in a previous log.
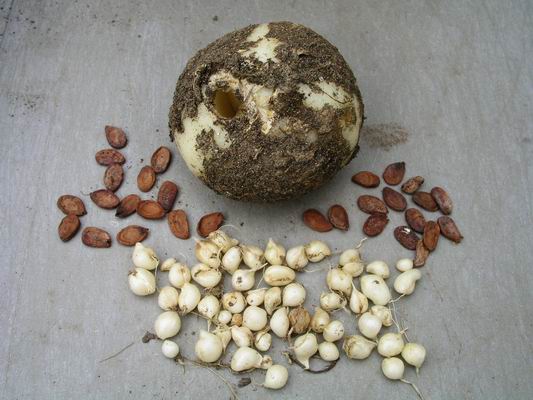
Fritillaria sewerzovii bulb and seed
Enough doom and gloom, you will be starting to think that I cannot grow frits at all. Here is a perfectly healthy bulb of an especially nice form of Fritillaria sewerzovii given to me by Janis Ruksans. Last year it produced some seed which I sowed back in the same pot and you can see the resulting seedlings in the picture. That is not new seed but the remains of the germinated seed that I picked out from the gravel top dressing - it did not set any seed this year.
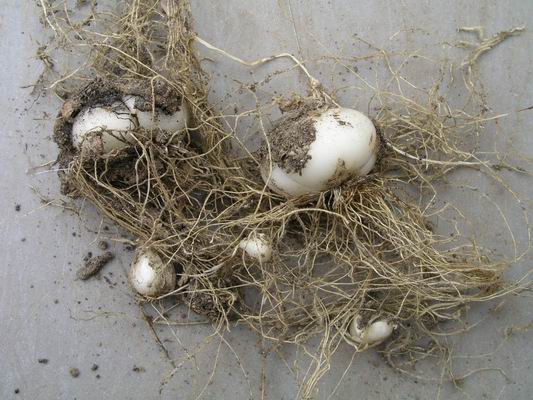
Healthy Frit. meleagroides bulbs
This is what I like to see when I tip out a pot; healthy bulbs with the dried out remains of what was a good root system.

Healthy frit bulbs
I am convinced that it is better to plant your bulbs close together when you are repotting so that there is not too much compost in the layer around them -they much prefer the company of other bulbs.

Surrogate bulbs
So what do you do if you only have a few bulbs? I have discovered that the bulbs do not know the difference between another bulb and a piece of polystyrene (styrofoam). I call these 'surrogate bulbs'. Packing out the planting layer with these ersatz bulbs creates a microenvironment within the pot which seems to suit the bulbs well. I have also been thinking and am now experimenting with planting different bulb species in the same pot - more on this in a later log.

Fritillaria stenanthera bulbs
Nice healthy bulbs of Fritillaria stenanthera showing how they are a sort of wrap- around scale until they are fully mature. Another interesting point is that the frits that have done best for us this year are all the earliest flowering ones like stenanthera and alburyana: they flowered in February / March when we had a mild spell before the weather turned cold and wet.

Dactylorhiza giant
I leave you with a flower Maggi is particularly fond of, though she looks a bit worried! This giant Dactylorhiza - a self sown seedling that we had to lift from a path a few years ago and replant into this bed where it associates well with D.'Eskimo Nell'.
^ back to the top ^
|
